Physical address: 6296 Donnelly Plaza Ratkeville, Bahamas.
DIY Landscaping Drip Irrigation System
A drip irrigation system is the most efficient method of watering your landscape plants. Landscapers continue to install these systems to promote healthy growing plants.
Drip watering systems save money, there is less wasted water and it is eco-friendly. Installation is a do-it-yourself project and we will guide you in the process of installing one in your landscaping.
Common Maintenance Issues
Unlike sprinklers a drip irrigation system will require some maintenance. The water pressure needs to be regulated periodically and the system winterized during the freezing season. The emitters can sometimes clog and need to be cleared and heads can sometimes pop off the hose from loosening in the hot sun. Regular inspection can help with these issues.
Planning Your DIY Drip Irrigation System
First step is to draw a map of the area you want the drip system installed. Next determine how much water each plant will need and make a notation on the map. This will give you an idea of how much water flow the system will require.
A typical house water spigot will have a flow of 3-9 gallons of water per minute fully open. Some houses will be less. You can check yours by filling a 5 gallon bucket for 1 minute and determining how much water is flowing per minute.
Designing Your System Layout
The drip system has several components each playing an important part in the system. The easiest system to install includes an anti back flow device to keep water from the drip system from backing up into your domestic water supply. This backflow device is installed on you spigot just like you would a water hose fitting.
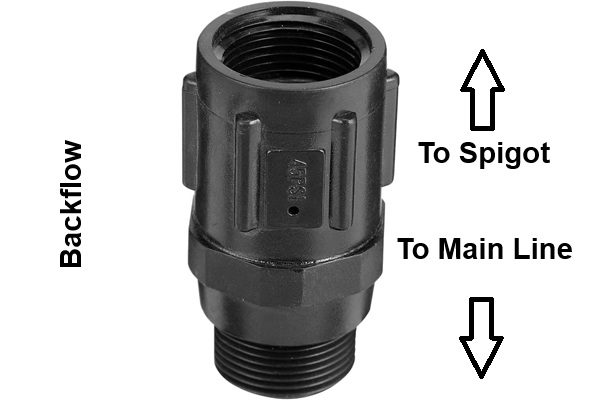
The next piece that is attached to the backflow is the main water line. Everything else will branch off of this line including tubing that will run to each plant and the emitters that will water the plants.
The main water line should run the length of your planting beds in your landscaping. If you need to run in 2 directions you can use a splitter at the spigot.
Parts You Will Need
• Tubing: Main water supply tubing 1/2″ and smaller emitter tubing 1/4″. • Emitters: Comes in different flow rates pick the right rate for your plants. • Connectors and fittings: Fit 1/4″ hose to 1/2 in hose, shut-offs ect. • Filters: A filter is optional in this setup. • Pressure regulators: Keep water pressure steady again optional in this setup. • Timer if needed
Installing Drip Irrigation System
Once you have laid the main line and determined what plants the system will water attach the system to a water source like a outdoor water spigot. Install the backflow device on the spigot (a pressure regulator if needed) and layout and connect the main line to the backflow.
Connect 1/4″ tubing to the main line with connectors and lay out the 1/4″ tubing to each plant leaving extra just in case. Install the emitters and secure them to the ground at the base of the plant with the plastic stakes.
Turn on the water slowly while looking for any leaks. Check the all of the connectors and emitters. Make sure the emitters are watering the plants if not adjust them for flow rates as needed.
Maintenance
Check and inspect your system regularly and make repairs as needed. Flush the hoses on an annual basis and if filters were installed clean or replace them. Check for uneven watering and flush emitters or replace them as needed. This is a basic install and upgrades are available depend on your specific need.